You are a shining owner of a regular license based on Airtifact Theme! We just can say, thank you for choosing our theme for your project. THANK YOU.
This file will help you to start working with your new Wordpress Theme. First steps installing, guides to create your own pages, portfolio views or any other feature included.
In case you could have any doubt about some detail explained here or any other just create a support ticket, we will try to help as better as possible. Support Area →
Notice
Please, before asking for help, make sure you are using the last theme´s version.
The first point that we must talk about is 'how to install' any Wordpress Theme.
Package contents
01 - Theme
airtifact.zipFile to upload within Wordpress Admin Area → Customize → Themes.
airtifactYou can directly upload this folder to your site via FTP
airtifact-childYou should use it when doing modifications on the theme. Read more here.
03 - DocumentationContains the main theme documentation (it´s me!)
Requirements
Before to start working with your new portfolio, make sure that your Wordpress version is updated to the latest one.
You can know more about Wordpress requirements clicking here →.
1.1 Installing the theme
Please watch this video for a complete video guide on the installation & setup process
Runing the installer
Installing the theme using the Wordpress Theme Installer is really easy.
Log into your WordPress Dashboard → Appearance → Themes
Here notice the tab at the top side → Install Themes
You must click on "Upload".
Now you must choose the zip file you will find within the whole package that you downloaded from Themforest.
01 - Theme folder → "airtifact.zip" file.
The last step is clicking "Activate" once all the files are correctly uploaded.
Troubleshooting
If you find some error installing the theme like "Missing style.css" or something similar, please, make sure that you are uploading the correct zip file. It is important to have into account that the file you must install via the WordPress dashboard is the zip inside the whole package that you download from Themeforest. Following the file estructure it should be placed within '01-Theme' folder.
1.1.2. Setting up the demo content
After activating the theme, you will be prompted to a screen which will guide you through setting up the demo content, so that you can start from a certain point in customizing your website, always you prefer to have some helpers when starting like having some dummy content as starting point. The one click installing process basically goes into these steps:
Starting the setup process
Just press "Start" and the step-by-step installer will start.
Install Child Theme
You can choose to install a child theme along the main one, just in case you will do modifications to the theme, to make sure that you will never edit the parent theme, being able to update at any later point. If you only plan to do changes via CSS, we recommend you to do not install the child theme and do all your modifications via Apperance > Customize > Additional CSS.
Install Plugins
The theme requires certain plugins to run, and it also recommends others. You should install all plugins in order for the rest of the setup process to work, and if at a later point you want to change a recommended plugin, you can definitely deactivate it.
Import Content.
This step will import the entire demo content with blurred images. Please note that there is a lot of content to be imported, so be patient and do not reload the page.
All done! You can view your website and start editing.
Troubleshooting
In case you get the following alert "There were some server errors during the import", it means that your server's resources are too small to handle the entire import.
Step 1First of all, you need to see how hard did the import fail. Go to the WordPress admin and look if you have some pages or projects. If you do, it means that the importer failed towards the end and you shouldn't be missing too much, case in which you can go on.
Step 2 If you don't see any pages and when you go to Media you only see a few dummy images, it means that you need to increase your server's PHP limits. These should be:
max_execution_time 180
memory_limit 128M
post_max_size 32M
upload_max_filesize 32M
Ask your hosting provider to change these for you, then try the importer again (deactivate & activate the theme to get to the wizzard importer).
Step 3 If this also fails, then try importing manually, by going to WordPress Dashboard > Tools > Import > WordPress, and download our xml import file from this link. If the importer still cannot finish the job, then uncheck the media option, so that only pages will be downloaded.
Please remember that all of these errors will only happen on bad hosting servers, so if you cannot get started, this will only be the start of your problems. A good hosting service is always a good investment, so look at our list of recommandations!
1.1.3. Plugins breakdown
Here's a breakdown of all the plugins that the demo installer installs, so that you know which does what.
Required plugins
Core
Advanced Custom Fields
This plugin is required for the custom fields which are used through the entire theme.
Portfolio
Airtifact Portfolio
This is the plugin which activates the portfolio custom post type. Without it you cannot have portfolio project
Content
Airtifact Shortcodes
This is the plugin which will give you a few basic shortcodes.
Optional plugins
SEO
WordPress SEO by Yoast
A really useful plugin which gives you all the tools that you need in order to make your site search engine friendly.
Cache
W3 Total Cache
If your hosting company doesn't already offer some kind of caching for your WordPress installation, you should install this plugin with a minimal configuration to make sure that you'll benefit from a fast website.
Forms
Contact Form 7
Powerful and really useful plugin for creating all kinds of forms on your site. Required if you want a contact page with a form on it.
UPDATES
Envato Market
Created by Envato, this plugin allows you to connect your marketplace account with your website in order to get updates for your themes & plugins.
SOCIAL
Twitter
Install oAuth Twitter Feed for Developers in order to display your tweets in your site.
1.2. Theme Customizer
Take a look at all the customizer options in this video
In the WordPress dashboard, there is a submenu under 'Appearance' with the tag 'Customize'. If you click on it you will be taken to the WordPress customizer, a core tool which will allow you to modify the look and feel of your entire website.
Site identity
Here is the place where you want to give a title and a tagline for your website. The title and tagline are normally used only in the top bar of the browser, however, if you choose to display a regular text logo, the title you set here will be used. You can also upload a site icon/favicon.
Logo
Enable or disable the image logo and upload an image. You need to choose a height for the image that you upload and make sure that your image is at least double in size than the height you give it in order to display it sharp on all devices (Retina/HDPi screens).
You can also add a mobile logo image in cases where your regular logo is really wide and you need to shrink it up a bit.
Header
Enable / disable various functions related to the theme's header, such as sticky behavior or general appearance.
Color scheme
Here you have all the color options available in the theme. Some are general options, while some can be overwritten inside individual pages (like background, text and accent colors), but this is the place where you start with your global color scheme.
Typography
The theme comes with two custom fonts that are carefully selected and matched in order to give a great experience out of the box.
However, you still have a selection of Google Fonts to choose from if you wish so. Or leave the "use custom fonts" option and upload your own set of fonts.
Menus
Choose the theme's main menu as you usual do in any other WordPress theme. Just add your pages in the area dedicated and save your changes in order to setup your main menu.
Portfolio
Here, you need to choose your default portfolio page. This step is really important for certain features like project navigation and related section.
General
Enable / disable various functions within the theme as the AJAX functionality, social share options or page actions.
Layout
Change the theme's maximum width and disable the footer in single post / portfolio pages.
Widgets
Here you can set the footer / blog sidebar widgets. Please note that the sidebar widget area doesn't appear unless you're editing from the blog page and the sidebar is enabled.
Homepage Settings
Here you can choose the homepage for your website. It can either be the blog page, with a list of your latest posts, or it can be any page that you desire (like a portfolio page for example). The second setting is your posts page (the blog page).
Additional CSS
The place where you want to add any custom CSS. If you have lots to add, you could also use the child theme's stylesheet for this purpose (recommended).
Notice
Whenever you make a change you’ll see the actual website refresh with the changes you do. Make sure that when you’re done, you hit the Save & Publish button. After this, you can close the customizer.
1.3 Staying up to date
It is crucially important that you always stay up to date with all of your themes, plugins & WordPress installation. For this purpose, Envato created a plugin called Envato Market, which we've bundled in our theme.
The plugin is pretty straightforward to use. Once you install & activate it, you will get a new menu item with the same name. Inside it, you have instructions on how to connect your marketplace account (which is a breeze - just click the big button and if you're logged into your Envato account, everything is done automatically). Once you are connected you get access to all of your past and future marketplace purchases.
As soon as we release a theme update you will be notified in your WordPress dashboard.
2. Adding Content
Adding your content is really simple and easy with our page builder and all the options that the theme has to offer. Just make sure that you take your time to carefully explore all the settings that can be changed and learn how to create some amazing layouts in order to impress your users.
2.1 Page Builder
Please watch this video to learn how to create a page from scratch using the theme's Page Builder
As you've already seen in the video, our page builder is a really simple application which allows you to easily create columns in any page that you wish. It's really lightweight and it doesn't bloat the content page with unuseful markup. It doesn't use shortcodes or meta for the output, it simply works with pure HTML, directly in your page content, thus being really SEO friendly and easy to manipulate. Also, and very important, our builder is not locking/jailing your contents as many other popular page builders out there.
In order to start creating content in this way, you need to click the "Show Columns Manager" button at the top left corner when editing a page.
After doing this, you'll see a pretty intuitive dashboard, where you just click "Add column" and you're taken to a popup from where you can add content the regular WordPress way that you're used to. You have the TinyMCE editor, with all it's bells and whistles there.
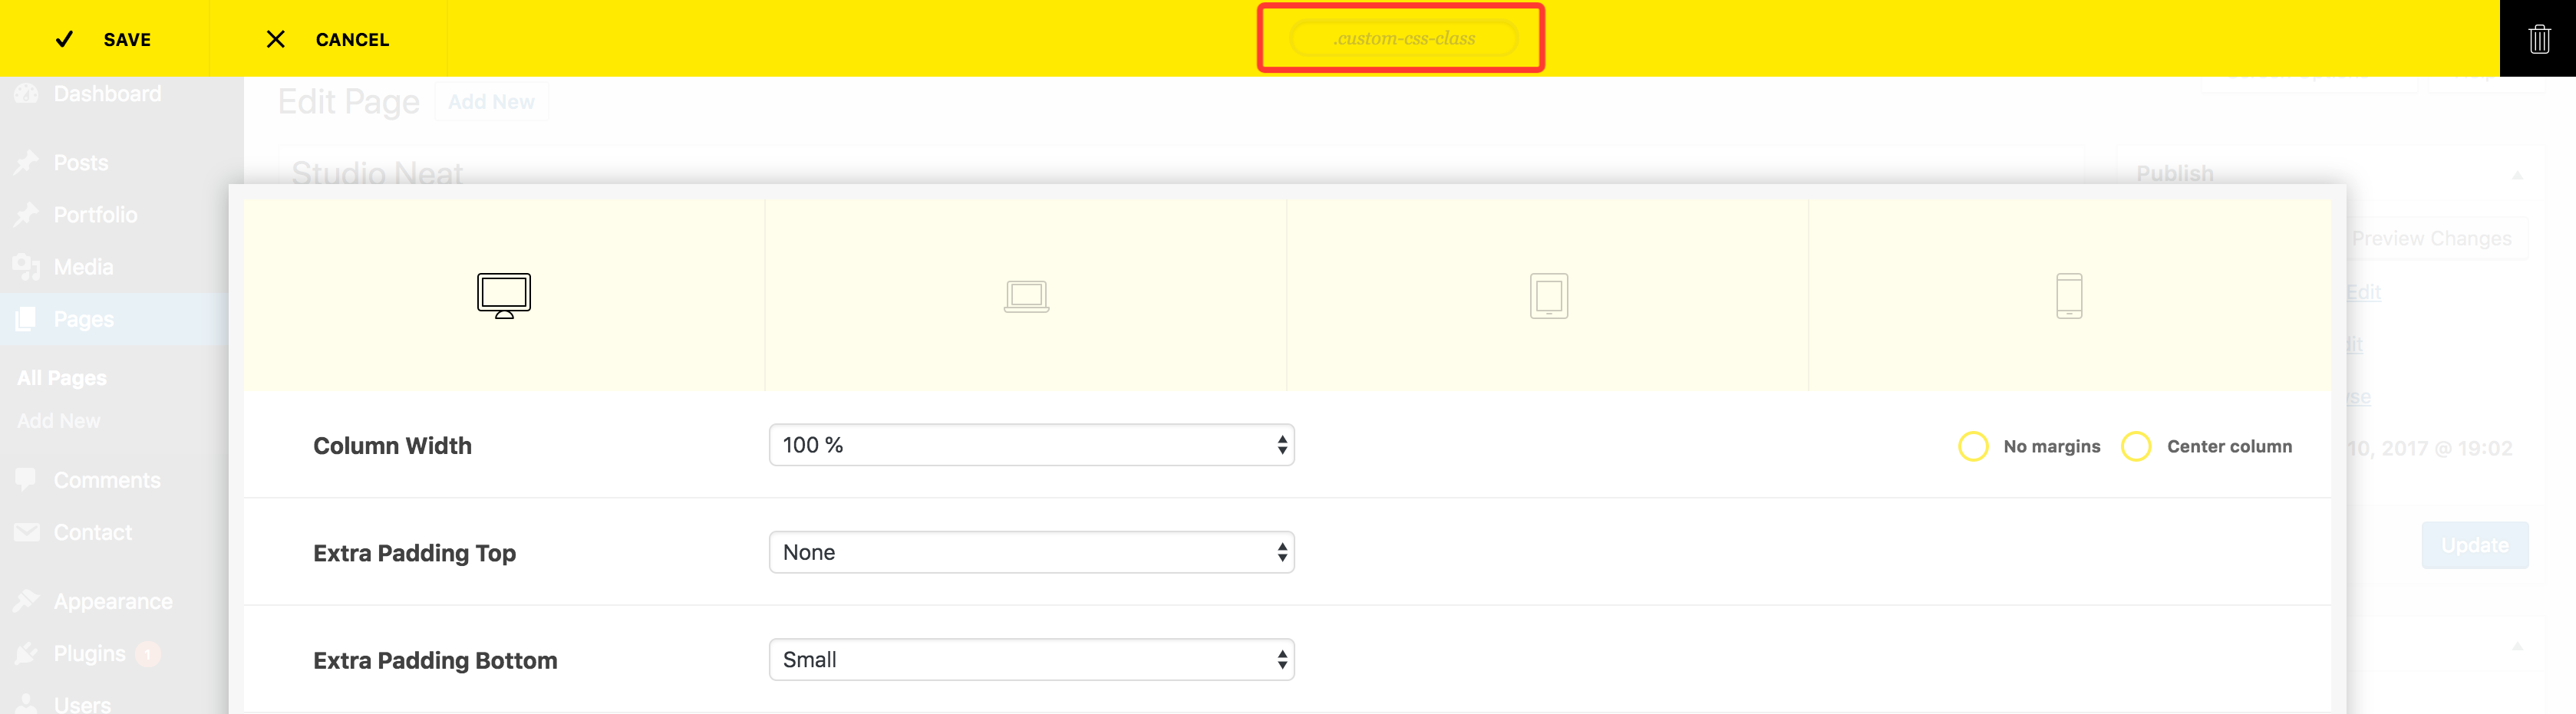
At the top you can choose column width and option top / bottom padding. You can also center a column from here. You also have options for several screen sizes if you want to further tweak the responsive design of your columns. Normally you don't have to change this, but you do have the option to either select a specific column size for each screen or even hide the column completely.
When you are done putting your content, you just have to hit the "Save" button, and the new column will appear in your page. You have further options of resizing columns from the app, moving them around, editing, cloning or deleting column elements.
It's that easy! If you've worked with complex page builders before you'll just love how easy and simple this is, and you'll be able to focus on your own content. If you've never used builders before, you'll find this incredibly easy to learn. Learning curves no more. And of course, if you miss those complex builder, you always can install some of them, just make sure that you disable the theme's one. But we know that if you already give a try to ours, you'll miss it so much that you would enable it one more time. We love easy, as you do too.
Details about the page builder
With the custom page builder you can drag and drop in a very easy way between columns, clone columns and modules, play with font sizes, colors and add special classes to get some transforms in order to help you to achieve really stunning layouts and designs. Bloated code never more.
Custom classes. In the field which is present in the top bar of any column, you can write one or many extra classes, in order to style them differently via CSS. We also have our own classes which can be used to further tweak the columns:
full-width: makes a certain column extend beyond the horizontal limits of the layout, making it totally full width. If you embed a single image inside the column, it will take up all the space and be displayed proportionally.
parallax-bg: adds all prerequisites for a "parallax background" image, either for a regular or (prefered) for a full width column. It works in conjunction with a separate class to define the background (see below).
no-right-margin: pretty straightforwards, it removes the right margin of the column.
no-bottom-margin: same as above, only for bottom.
no-list-style: In columns with lists inside, this class removes bullets or list styling.
list-compressed: This class changes line-height for lists with an smaller one.
circled-img: When you want to transform some image into a circle, just add this class to the img element.
Adding background images to columns
For this purpose, you need to give the column an extra class, for example bg-1. Then inside the css editor (Appearance > Customizer > Additional CSS), add the following snippet:
Replace the url with a full path of the desired image.
And of course, you always can write any custom classes, add them via Appearance > Customize > Additional CSS and to write the class in this dedicated field.
2.2 Page options
Please watch this video that explores all the paage & header options
Page Style
Each page can have a unique style. The general color scheme will be applied everywhere in the website (via Appearance > Customize > Color Scheme), but if you want a certain page to have a red background with yellow text, for example, this is the area to edit. You can even add a custom image logo for each page.
Hero Header
The hero header is used in conjunction with the page style, because it is a static header which fades out, being replaced by the page's content and background color, allowing you to creative amazing layouts!
You can have one or more images for the header, a video, and also put a custom tagline over everything.
You have different options for your hero element:
Single Images
Slideshows
Background Videos (self-hosted files)
Custom Tagline
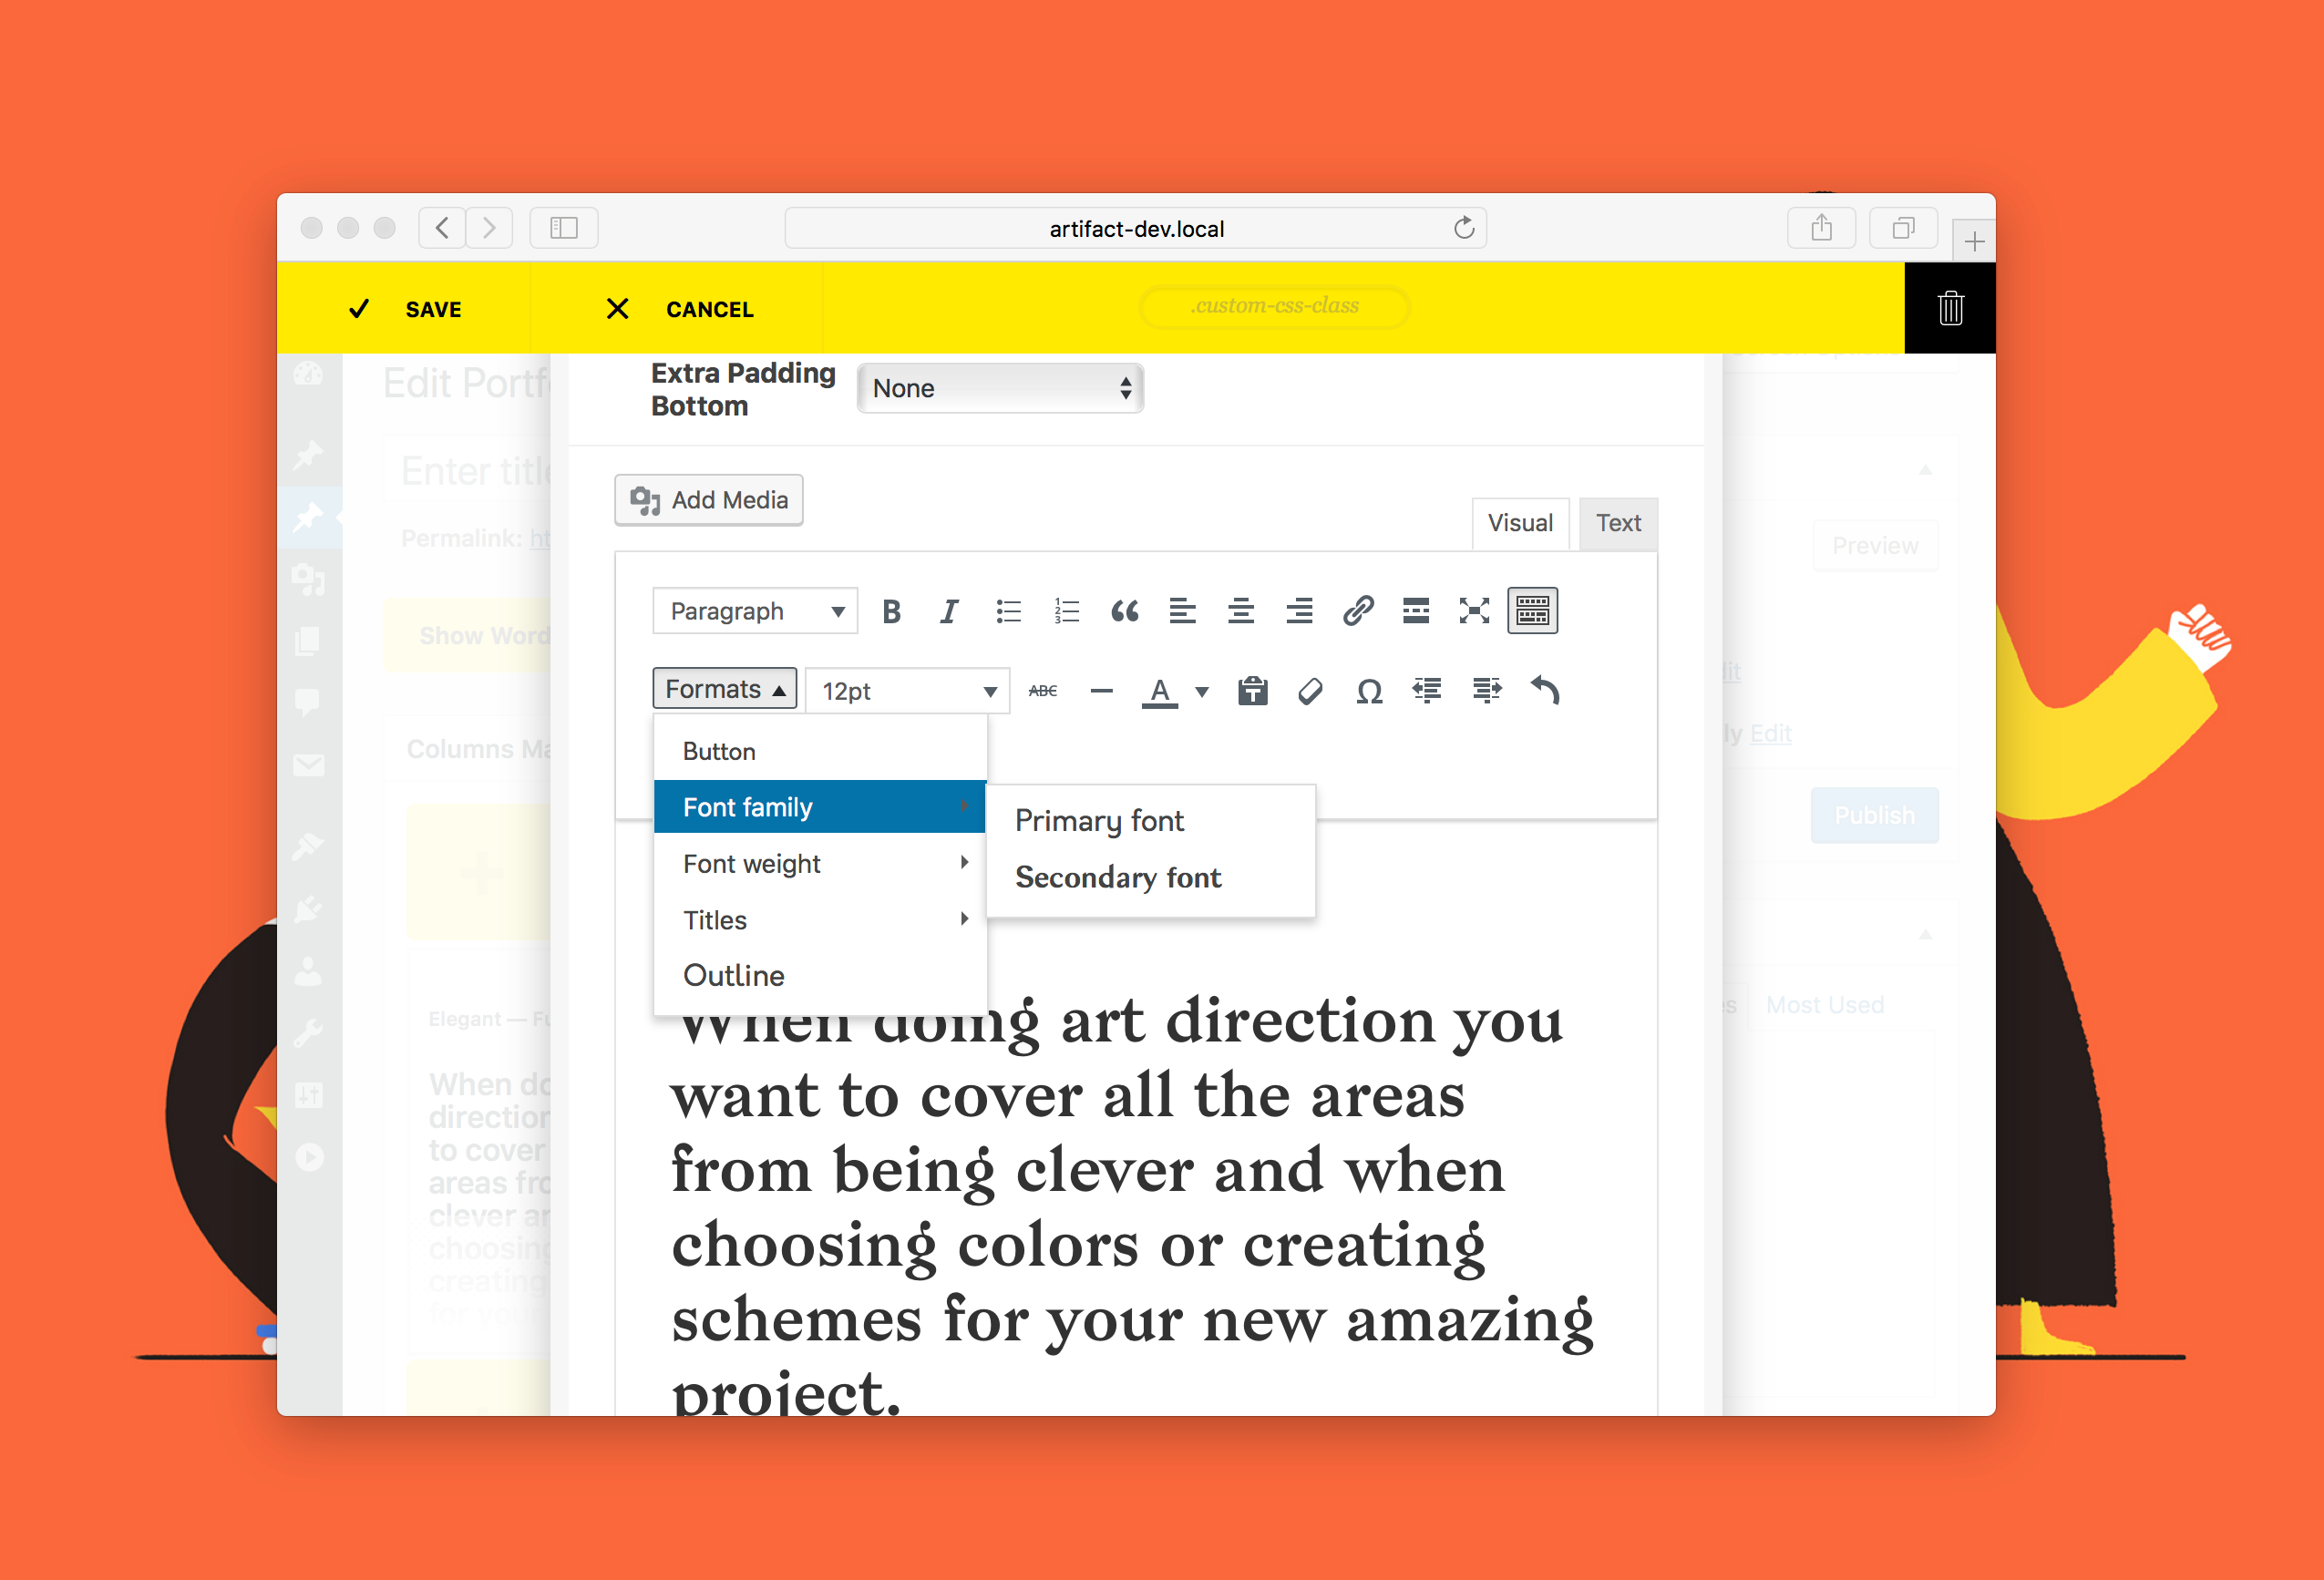
The custom hero option is one of the mosts interesting features. As you'll see, with the core editor integrated in this option, you'll be able to play with your custom page titltes and taglines in a very easy way. You can assign different fonts to your needs, different positions, sizes, colors... Everything you could need to write and as you could need to write it. Just playing with the simple tools provided you are able to create unlimited results.
2.3 Adding Pages
The process of adding pages is quite straightforward:
Go to Pages → Add New
Enter a title.
Setup the page style (optional - info previously explained).
Setup the hero header (optional - info previously explained).
Insert all of your remaining content in the content area. You can use the columns manager for this purpose.
Select a page template or leave the default one
Write a few words excerpt (it is good for search results and SEO to have an excerpt, no matter what kind of content do you have in your post).
Hit "Publish" and you're all done.
Page Templates
As you might already noticed, there are a few Page Templates available for you to use. Each template will configure your page to look and act in a different way.
Default Template — This is the default template and it outputs exactly the content of the page, without any modifications.
Portfolio — This is a highly configurable page which outputs all the portfolio projects that you have on your site.
Contact — This templates introduce your latest project or featured works in a beautifully animated full page.
Cover — This template creates a contact map, based on Google Maps API, which can be triggered and shown inside your page.
2.3.1 Shortcodes
The theme has a few shortcodes embedded in the shortcodes plugin, which give you additional tools in adding content to your website.
These need to be written manually, since they are only a few and with basic options. To add a shortcode, simply write it like a regular paragraph inside the text editor (wheter this is done with the theme's Page Builder or within regular content).
This is the twitter slider, which allows you to share a number of your latest tweets inside a text carouel. Just put your username and the no (number) of tweets that you wish to be displayed.
Content slider
[artifact_content_slider]

  [artifact_content_slide]
    Artifact has transformed a complex project into a simple and smooth process.
  [/artifact_content_slide]

  [artifact_content_slide]
    Artifact has transformed a complex project into a simple and smooth process.
  [/artifact_content_slide]

[/artifact_content_slider]
This is the content slider. It allows you to create a basic text carousel, with unlimited slides..
This is an easy shortcode which allows you to put portfolio items anywhere you wish. It's really simple, having only three properties:
page_id - this is the most important! It refers to the original portfolio page, which contains all the style settings (thumbnails, grid, captions, colors, etc. - all portfolio properties are taken from this page).
no - an optional parameter, it specifies how many items from the portfolio you want include.
cat - another optional parameter, it allows you to define custom categories to be used instead of all categories from a given portfolio.
A bit more complex shortcode, this is the gallery shortcode. Initially, it can be created using the Add Media button, and then Create Gallery. Select your desired images, add captions, order them as you wish, choose a certain columns number, then insert the gallery into the page.
After the gallery is inserted, you can edit it in a few ways. For this, turn on the Text tab, so you can see the text shortcode. You will probably see something like this:
There are some parameters which you can add in order to change the gallerie's appearance (just like in the above example):
size - it refers to the size of the thumbnail, not the size of the lightbox item. It should be manually set to "large" or "full", depending on your image's size and the number of columns that you want.
link - it can either be "file" (in this case the ligthbox opens the bigger version of the uploaded image) or "none" (in this case the gallery is plain, without any actions available).
type - if present and set to "slider", it turns the grid gallery into an image carousel.
css_class - you can add custom classes to the gallery object in order to further style it via css. There are also two classes available which have effect on the slider type. One is "arrows", which navigation arrows to the slider, and the other one is "single", which turns the carousel slider into a regular slider.
Related to the gallery, there is also one other feature available, which needs to be explained here. It's the ligthbox.. By default, any image wrapped in a link can become a lightbox engine. However, you can also use lightboxes in other ways - for example, you can add video iframes as links to images. Just add a link to an image, and make it point to a custom URL, which should be the iframe src. At the end, give the link the classes: fancybox fancybox-iframe.
Please watch this video that explains how to add an iframe content into the lightbox engine
2.3.3 Forms
Airtifact doesn't have any dedicated form builder, because it offers you styling to use your own form plugins. We recommend Contact Form 7, as it's free & easy to use.
There are a few elements which you can use in order to style the form.. Below you have an example on how we built the contact form in our demo:
As you can see, we've wrapped all the fields inside a div with some classes, then each field has it's very own container, again, with a class specifying that it's a grid item, and one class specifying the actual width.
After installing this plugin you will see a new tab when creating forms.. In that tab you need to insert MailChimp details, such as your API key & subscription list id. Here's an example MailChimp form:
<div class="cf-7 mailchimp">
  <div>
    <small class="news-form-footer">No Spam — Period</small>[email* email placeholder "Your mail here"][submit "Send →"]
  </div>
  [acceptance acceptance-188 id:check-notice] I agree with the general terms [/acceptance]
</div>
3. The Portfolio
Please watch this video that explores the portfolio options
3.1 Adding new projects
The process of adding new portfolio projects is easy:
Go to Portfolio → Add New
Enter a title
Select a post category.
Choose a featured image. If you don´t add any, it could break the grid.
Choose a secondary featured image (optional, of course). It will appear in the grid, when hovering the thumbnail. Should have same size as featured image.
Setup the hero header for the current post (optional, of course).
Insert all of your remaining content in the content area. You can use the columns manager for this purpose.
Write a few words excerpt (it is good for search results and SEO to have an excerpt, no matter what kind of content do you have in your post).
Click "Publish" and you're all done.
3.2 Setting up the portfolio page
As you've already seen in the video, there are lots of options to display the portfolio. You can have a fixed masonry grid, a flexible one, or even thumbnails resized all the same, based on a certain aspect ratio.
The fixed masonry and regular grids are pretty easy to understand. In this case, just upload really large images (2560px wide images should be good) and let the theme do all the hard resizing. You will also be able to easily play with the available options.
The flexible grid is the most interesting one, and it works just like a regular masonry grid, the only difference being that you can "break it" with thumbnails that are larger than the regular columns number.
First of all, you need to choose the number of columns you want to work with. The highest the number, the greater the effects that you can achieve. So let's start with 4 for example. If you view your portfolio page, you'll see a basic 6 columns grid.
Now, for the fun part, choose a project, and edit it. Inside, you'll see field called Unique Project Settings. There you can choose a multiplier for your column. If you choose 3 for example, this project will have the size of 3 columns instead of 4..
This is the basic idea and it's awesome to play with it. You have to remember that images keep their ratios, so for a perfect grid you'll need perfectly resized images. The easiest way is to upload perfect ratios, like 1:1, 2:1, 3:2, etc.. Below you have an example grid.
The minimum width for a thumbnail is 640px (this is for large 4K monitors), but in the example we've used 750px, for an easier understanding. Resizing your thumbnails this way will give you the sharpest grid. Please note that even the slightest mistake, like 750 x 751px, will give you bad results in the grid.
A note on cropping
In order for the flexible grid to work with easy ratio values like the ones we gave as examples, the theme crops the thumbnails, for the grid to perfectly fit together. This cannot be changed unfortunately, otherwise this grid is just impossible to achieve. Cropping occurs on all variations of the flexible grid.
3.2.1 Unlimited portfolios
The latest notable feature is the unlimited portfolios one. This allows you to create unlimited portfolio pages, each with it's own projects, settings, navigation, categories, etc..
First of all, create two separate portfolio pages, we'll call them A & B.
Create four projects under two separate categories, let's say projects a & b under category 1, and c & d under category 2.
Under each individual project you have the "Unique portfolio page" setting. There you can choose a parent page for each project - so simply assign projects a & b to page A, and c & d to page B.
Then inside each portfolio, choose the categories which include the projects that you've assigned to that portfolio page - assign category 1 to page A and category 2 to page B.
That's it! If you've done everything right, you should have two totally separate portfolio pages, each with it's own settings, color scheme, layout, projects & navigation between projects.
Ordering your projects
The easiest way to sort your projects is by using the popular Post Types Order plugin.
4. The Blog
Please watch this video that explores the blog options
4.1 Adding new posts
These are the default steps that you need to do in order to add a blog post:
Go to Posts → Add New
Enter a title.
Select a post category.
Add some relevant tags.
Choose a featured image.
Insert all of your remaining content in the content area. You can use the columns manager for this purpose or simply use the normal WordPress text editor. But the page builder will help you to achieve more interesting layouts!
Write a few words excerpt (it is good for search results and SEO to have an excerpt, no matter what kind of content do you have in your post).
Click "Publish" and you're all done.
About featured images
Airtifact does it's own resizing process, and there isn't any standard size, since both the grid and the journal will display the images in their true aspect ratio. Just make sure that you upoad large images, up to at least 1140px wide.
4.2 Setting up the blog page
As you've already seen in the video, there are lots of options to display the blog. Whenever you set a blank page as the blog page from the Reading Settings, it will have a certain set of options.
You can choose between the journal and magazine layouts, add a carousel for featured posts, and enable or disable the sidebar.
5. Features & Tips
This short chapter covers some tips & tricks that you can do in order to make the site look and run better.
Theme customization tips
We are constantly updating our knowledge base with various customization tips. Make sure that you check them out here at our dedicated support forum.
5.1. Child Theme
A WordPress child theme is a theme that inherits the functionality of another theme, called the parent theme. Child theme allows you to modify, or add to the functionality of that parent theme. A child theme is the safest and easiest way to modify an existing theme, whether you want to make a few tiny changes or extensive changes. Instead of modifying the theme files directly, you can create a child theme and override within.
This theme already comes with a child theme (airtifact-child-theme), which you can use directly if you want to replace PHP functions from the theme or have lots of css code that you want to paste in.
When we released v1.0.6 a new Font Manager was added to the theme. As you could do before, you can choose from Google Fonts and now from system and custom fonts with one single UI. Below you can see more in detail how this new feature you will find within Appearance > Theme Fonts looks like:
5.3. Make your site faster
5.3.1. Get a good hosting
You may think that this is not an important aspect of your website, but if you want your site to run really fast, you need to get good hosting. This is the first step in having a fast site, which also translates into more visits, which also translates into a better SEO, which finally translates into more sales.
There are a few hosting companies which we recommend:
Cloudways (our recommendation) → After a decade of working with users from all over the globe and trying all kinds of hosting providers, we have found a company providing the best value in terms of performance and pricing. Starting just at $10 (it includes a free SSL certificate) you will have a highly performant service that will bring your website to a different level in speed terms, security, and fully supported. This is the company we use for all of our operative needs. We are recommending it because we found a high value and we want to share this with you as well. We know how frustrating to deal with hosting companies is, just start a hassle-free WordPress installation now.
Kinsta → A very good and high quality option for your website. One of the best options in the market.
Flywheel → Fully specialized on hosting optimized for WordPress websites.
Media Temple → If you want a premium WordPress hosting which is easy to manage and works pretty well, this is a good choice to host your website on.
SiteGround → During many years, this was one of the best choices and it still is. Even the smaller plans are working nicely for small projects.
5.3.2. Optimize images
Always optimize/compress your jpeg images before uploading them to the server. Large images should be compressed at around 90% image quality and you should also try to limit the use of lossless image files (uncompressed pngs). An app you'll love and will help you to save lots of bandwidth in your site is ImageOptim, with app for Mac and web service to compress all your image files.
5.3.3. Use a caching plugin
We can’t recommend enough the necessity to good caching. If you use a managed hosting such as WPEngine you don’t need this, or maybe SiteGround, where they include their own cache plugin for WordPress. But if you are using MediaTemple or any other hosting you need to cache your content. For this purpose, we recommend W3 Total Cache. It’s a great and easy to use plugin, and with only a bit of work you can double your site’s speed.
Cache tips:
Enable page caching
Enable database caching (it might be a bit unstable but you need to check it out at least)
Don't enable object caching (the theme doesn't use that, so it's useless)
Don't minify anything! CSS / HTML minification usually breaks themes, and the JS files are already compiled into a single minified one.
5.4 SEO Advices
The theme is built in a way to be SEO friendly, by emphasizing titles with heading tags, having the content before anything else, stripping out useless content, fast loading, setting titles in the header for better crawling, etc... All these help... But you have to remember that Content is King! So you shouldn’t blame the theme because your website doesn’t appear in search engines. You should always focus on providing good content and in this way, your website will definitely look great in search engines.
Also, you should always install a popular SEO plugin which will make the most of keywords and descriptions.
We suggest using Yoast for SEO, which will help for sure to optimize your site in terms of search indexability.
5.5 Translating the theme
This theme is localized, which means it can easily be translated in your own language. There are various methods to do a simple translate or create a website in multiple languages, so just use the one which works best for you.
5.5.1. Simple translate
The theme offers a .pot file which contains all the used strings (backend & frontend included). You can use this file in order to create your own translation or even change english words/literals you would like to read different. For example, you may want to change the literal 'Next' by 'Next Project', for this propose you could even use this methodology. However, the most easy way is to use a third party plugin. We recommend Loco Translate. It's an amazing piece of software, which allows you to do translations with ease.
5.5.2. Multilanguage
If you're looking for having your website in two or more languages, there is a powerful plugin which you can use. Because of the module builder, you need a plugin which handles meta fields. This plugin is WPML!
Latest docs update:
Credits
A special big 'THANK YOU!' for those talented artists and creatives that provided us with some of their amazing pieces to illustrate Airtifact Portfolio Creative WordPress Theme.